This guides show how to add new image to your Probook G8 laptop via Clonezilla and optionally upgrading it to Windows 11.
Time in total: 6 hours. (I add shortcuts to limit time consumption where possible). You might be able to do it in app. one hour if your have high speed internet / USB and strong coffey and is experienced.
Warning: This method delete everything on the SSD. Make backup if necessary first!
You will need:
Your new laptop.
USB key with at least 64 GB (or a 2 GB and external HDD or other media by wire. )
Access to the Internet – wired if possible.
Knowledge in Linux file structure.
Coffey and chocolate (Mandatory)
Overview of ToDo’s
- Initial start the new laptop and prepare new machine with Windows 10.
- Install Download software like VPN Clients
- Download Clonezilla Restore Image.
- Download Rufus.
- Download Clonezilla Lite Server Boot files.
- Install Clonezilla Lite Server on USB Stick.
- Prepare Clonezilla Restore Image /home/partimag
- Prepare BIOS for access to UEFI in Windows 10.
- Disable BIOS Boot Security settings
- Install new image
- Hardening BIOS
- Final Start of Windows.
- Add Windows 11 (optional)If you have a downloaded Clonezilla Image and USB-ready for boot you might be able to skip 2- to 7 = app. 4 hours of work.
Pre-info
First time you boot this machine in comes up in fresh Windows 10 without codes for MS Office even its pre-installed. In order to use the office pack you either need the Clonezilla image or much faster… the keys for MS Office. But as I only have the Clonezilla image that’s the road I follow here.
We have to waste lots of time booting this new machine and go through nearly all the settings even we destroy this pre-installed OS in a moment. But as we need to disable some security functions in which can only be done from the pre-installed Windows 10 since its “hard coded” into the BIOS.
- This machine comes with hard security functions added an enabled, i.e. you have to do some settings and fixes to make the machine bootable from USB or network.
- The keyboard is locked in reverse Functions which the laptop not to respond on any F0, ESC and others at boot. You need to make workaround and enable this. (Pressing Fn + Left Shift is now an option on upgraded BIOS)
- Bitlocker seems to be enable as default i.e. you may not be able to access the files on the SSD via Linux as it does not recognises the file system as valid.
- For security reasons I prefer to have the laptop behind a physical firewall of its own (Typically a fast home router).
ad1) Initial start the new laptop and prepare new machine with Windows 10.
Note: I use the new ProBook itself to handle all the tasks. You may use another machine if you can take the SSD out or by Ethernet, but you need to be experienced in Linux to do that.
- Start the laptop without internet access.
- Go through the welcome setup but SKIP all the network, hardening and accounts settings. We are crashing this initial OS in few minutes anyway.
- Go to Update, pause updates for 7 days. (This saves us lots of times as updates might takes hours and we don’t need them here).
- Set firewall to standard settings (just to be sure).
- Add network (cable or Wifi).
ad 2) Install Download software like VPN Clients
Go to your company extranet and download VPN client like Cisco Any-Connect or what tools the supply. Study an external guide in your company for this as this not a free service and differs from company to company.
ad 3) Start download Clonezilla Restore image.
Download the proper Clonezilla restore Image from server over VPN or what you use. Avoid FTP. Use true copying when possible because of the bit controlling system.. ProBook G7 Image goes fines too, but requires some updates later. (you need a very stable connection and don’t want to experience at the 37 GB of download your FTP fail).
This steps app. 3 hours and if you have installation media and keys locally you can do an installation much faster.
New trick
Tested January 27th 22: It is possible to boot an USB stick or USB-HDD directly without the need for making it bootable:
I have used this one: https://clonezilla.org/liveusb.php#windows-setup and simply copied the content from the restore image /home/partimag to the root of a huge USB-HDD and it works right out of the box.
You can skip the download of the Rufus and go directly to item 7. Lots of times saved 🙂
ad 4) Download Rufus
Download Rufus portable.
ad 5) Download Clonezilla Live Server boot files
Download Clonezilla Live server.
(The Server Edition with XCFE Desktops halts at boot. I assume its due to lacking graphic card information).
Choose the stable ISO version (2.8.1-12) (SourceForge see,ms to performs best in terms of download speed).
Ad 6) Install Clonezilla Lite Server on USB Stick
Put your USB-stick into your laptop.
Start RUFUS Portable and allow update over internet if it ask for it.
Follow the instructions. Tips at Clonezilla here or at GeekyProjects
Now you have a full working Clonezilla running on Debian. We come back to this later.
Coffey time while waiting about 2.30 hours for the Clonezilla Image to download.
ad 7) Prepare Clonezilla restore Image /home/partimag
When you have downloaded your new image from the server:
Unpack it.
Copy the folder /home/partimag to your USB stick, to the top level your external USB HDD or to another windows PC or SSH server of your your choice. (Should be something like E:\home\partimag)
In this guide I use the external USB HDD and it requires at least 40 GB free space.
Tips: When you have downloaded the Image once then save it locally for use later. No reason to waster 3 hours on this again.
I prefer a separate downloads for Clonezilla and the Linux media (Debian) as I can use the for “universal knife” later. At the same time its easier to install and can be done while waiting for the image main to be download saving me something like 15-20 min. It also makes it possible to boot on a 2 GB USB sized disk only.
ad 8) Prepare BIOS for access to UEFI in Windows 10
Now we are ready to install the image, but first we need to do some workaround on the ProBook 650 G8 for allow other operational systems and boot over USB.
22 JAN 2022:
Hot cheat trick: Just experienced, that the newest HP 650 G8 might be prefitted with new BIOS settings without booting password and local boot menu= making it much smarter to install ned Clonezilla image.
If you have downloaded installed bootable Clonezilla on USB stick and have access to image /home/partimage locally already then try this:
After power on: press F10 and ESC alternately with app. 1 second interval. This should boot you up in a local boot menu. Goto F10 BIOS.
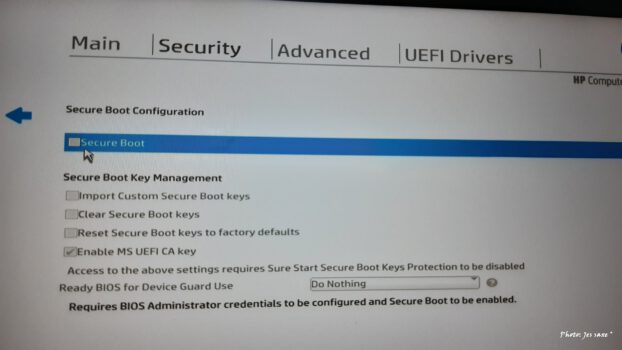
In BIOS – Security -> Disable Secure Boot.
Save settings -> EXIT.
At boot: press F10 and ESC as above. Press F9 and choose your bootable USB key.
You should now be able to install your new image without the need for starting the pre-installed Windows and thus save time.
After the installation go to item 11 and end the post installation. You should now be done in less than one our.
If you boot Clonezilla in RAM and use another pc as server with shared c:\home\partimage and acces over the network via cable, you should be able to handle 4 PC in about 2 hours.
Or:
In Window we need to make it boot in special and advances settings to make access to the BIOS.
Goto Systems by: Windows Key+I
System -> Genoprettelse – Avanceret Start
Fejlfinding -> Avancerede indstillinger
Indstillinger for UEFI Firmware -> Genstart
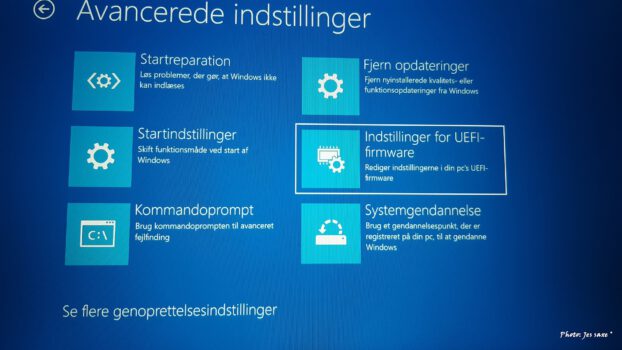
Now the laptop Boot into a new startup Menu
ad 9) Disable BIOS Boot Security settings
Now you should be able to press F10 Bios Settings.
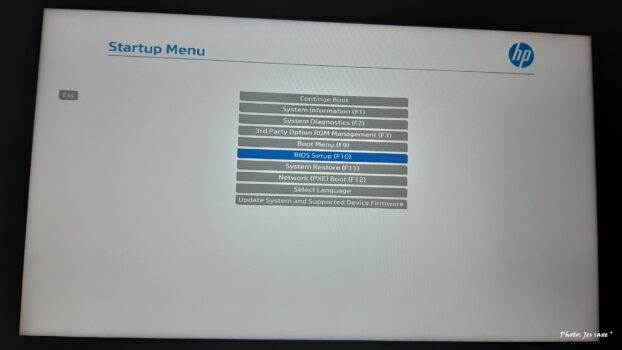
In BIOS – Enable USB, enable Boot form USB, Enable Allow F9 for change of boot order.
Disable ALL security functions like TPM and UEFI control. (We reset it all later).
Boot and enter the codes the BIOS shows for accepting the changes.
When it boot, pressing F9 should give you the opportunity to change to boot on USB-stick.
ad 10) Install new image
Time: app. 60-120 min
Boot your laptop on the USB -disk. This starts up the guide for Clonezilla.
Follow the instructions there as you enter the settings.
Choose your media as described and add the /home/partimag as mounting point from top level. This will give you the options to recover from the image to the laptop. Otherwise the recover menu is not shown.
(I choose not to do image check nor media check as this takes hours controlling block by block).
After the last boot sector is written you should be good to do a shutdown but check error codes first.
Shutdown safely
Take out the USB-keys and other USB HDD or network cables.
ad 11) Hardening BIOS
You should now have a new Windows 10 with MS Office nearly ready to use. But before that we harden the BIOS again:
Boot
Press F10 at just after the keyboard enlighen and the HP logo appears and go to BIOS.
Apply Default Factory Security settings (and its boot)
Press F10 – Go to BIOS
Apply Security Default Factory settings (all the way down at the page)
Save, Boot Add the codes and accept.
It should now reboot automatically up in the new Windows 10. Do not add internet connection yet.
ad 12) Final Start of Windows.
The Windows 10 should now be fresh and good to use but still need some adjustment and customisation.
Without any internet connections: Boot
Go to Update and DISABLE for 7 days.
Add Strong password to your profile
Go to Firewall: Reset to standard settings. (just in case)
Go to Clock: update time for UTC and local. (Add NTP.SE as time server. )
Go to Settings and change the Network Name so its differ from everyone else with same Clonezilla Image. Use your company guideline and politics.
Reboot
Add network like cable and/or WiFi.
Update (this might takes time and make your pc useless meanwhile)
Update Office pack as well.
ad 13) Add Windows 11 (optional)
You might wish to update to Windows 11:
Side note: If you like to make Clonezilla boot a lot of PC simultaneously the trick is to:
Have a switch 1 GB or faster
A master PC / server
If you use a windows server make c:\home\partimag
Go to c:\home and share the folder partimag. Add a user
From the Clonezilla boot: Choose boot in RAM.
At the IP addresse
Choose SAMBA for windows (and SSH for Linux)
Add the info an continues the restore process.
You can now take out the USB from the laptop slave as the OS is running in the RAM and start another machine.
You might find tips here at Raymond
———————–
Made 14-16 JAN 22