Some says it very complicated to do a fresh install of RasPi OS. I use this home brewed method with easy tools:
On a windows PC:
- Download a Operation System for free of your flavour: https://downloads.raspberrypi.org/
I use the desktop version raspios_armhf without the fluffy software. Gives me more versatility use for little less use of MB. - Download rufus https://rufus.ie/
(I use the portable version). - Put your SD-card in your PC or laptop.
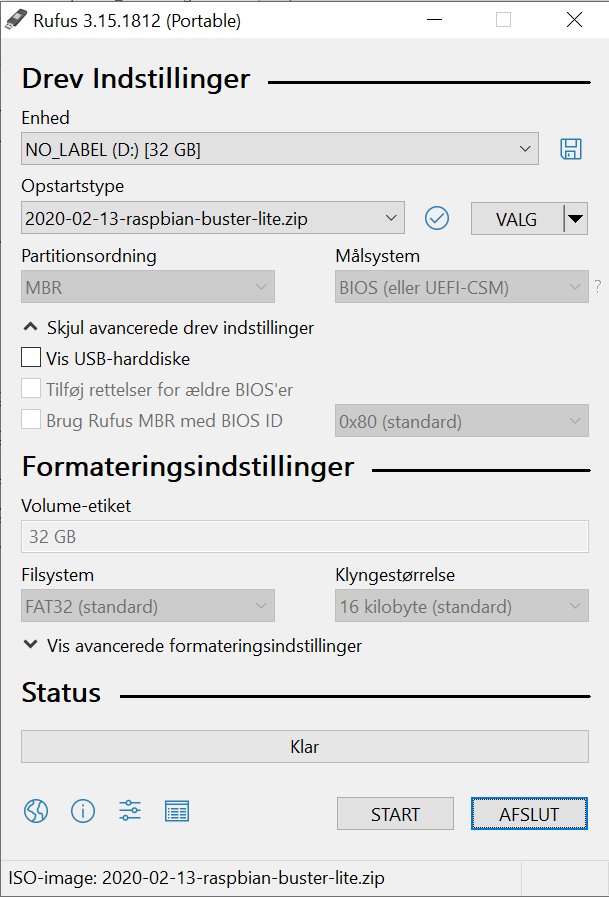
Warning: Everything will be deleted on the sd-card! It simply overwrites with new partitions too. - Start Rufus and add the OS of your choice.
Press start.
The partition writing take a few minutes.
- If you like to have remote access over SSH (port 22 for a start) aka headless at first boot you need two files:
a) file named “ssh” or “ssh.txt” you put in the /boot folder.
I doesn’t need any content. It can be every .txt-files you rename, or a new file. Its automatically deleted at first boot.
b) Premade user and password-file named “userconf.txt” in the /boot folder.
This file must have your first superuser (and root) login name and encrypted password in the construction of NAME:PASSWORD. Remark the colon between.At first boot the RaspiOS install-script looks for this files and add this user automatically to the RaspiOS. This gives much better security than the preinstalled complete open”pi:raspberry” standard access for and from everywhere. Per September 2022 this have been changed to the better.To construct this password-file use either another Raspberry PI, another Linux machine, or install your RasPi first time with keyboard and monitor connected and make a userconf-file after your boot and save it remotely on your PC for future use.
The command is:#openssl passwd -6For example the full userconf.txt-file with user “pi” and “raspberry” as password looks like this in encrypted form:pi:$6$xlerSNcJ3PaKlooO$fkV9ZMSqgDD7QdEZpLe119HSUenW2OtqeLFTcmoQvp9kY/OSCurIKVLNnChkfg5R7q3046pxnwt41zUp35itE1
This however should NOT be used in practice. Construct something better yourself than “raspberry” 🙂
- Unmount the card in the laptop and put it into your RasPi.
- Fire up RasPi. If you have monitor connected you might be lucky to read the actually startup IP address.
- Wait for RasPi startup to finish.It reboots a couple of times and automatically extend the file partitions.
- If you got the IP addresses you may make a SSH connection via putty or what you like.
- Otherwise you have to look at your DHCP server (often your router) and see the assigned IP.
- If you have monitor and mouse you may change the IP and DNS at the first logon. Ignore all the standard guides that pops up for now and go to upper right corner in LAN and add your preferred static IP, router and DNS if your want that.
- Otherwise via Putty SSH console (or console on the desktop) do
#nano /etc/dhcpcd.conf to look something like this.
hostname
clientid
persistent
option rapid_commit
option domain_name_servers, domain_name, domain_search, host_name
option classless_static_routes
option interface_mtu
require dhcp_server_identifier
slaac private
interface eth0
inform 192.168.8.200
static routers=192.168.8.1
static domain_name_servers=192.168.8.1 1.1.1.1
noipv6
(in Nano use CTRL+s for save CTRL+x for exit. ) - I use to make a quick install of firewall UFW here (in reality I add this before doing anything else):
#apt update -y (do not upgrade yet as it take sometimes a half afternoon)
#apt install ufw
#ufw allow from 192.168.0.0/16 to any port 22 proto tcp
# ufw enable - And if you like VNC you may add that now for remote control, either on the monitor or via console:
#raspi-config -> 1 Interface Options -> 3 VNC Enable. Save. Exit. - (If you add VNC you need to add port 5900 tcp as above. Otherwise you have no access).
- #reboot
Now log in via the new IP-address.
Then do all the customization by upgrading and settings as you prefer.
I strongly recommend to change SSH port 22 to something else. Its heavenly under attack by zombies and robots.
Edit:
#nano /etc/ssh/sshd_config
add the line
Protocol 2 (gives you stronger encryption)
Port XXXX (find someone that suits you)
then add your new port number to your firewall
#systemctl restart sshd
now:
Delete port 22 from your firewall.
Notes:
- The raspios_arm64/ is not stable using Chromium or Firefox.
- Big Bug: the new raspios_armhf (kernel 5) is not stable if you want sound on Firefox like listening to streaming web radios. Use /raspbian/images/raspbian-2019-06-24 with kernel 4.19 as the newest Do NOT upgrade (to kernel 5), only do update.
- Seems to be fixed in Bullseye kernel 5.15 32 bit version per September 22. NOT in 64 bit.
nice information and good article thank you