
Wireguard are fantastic speedy and easy to manage Virtual Private Network (VPN) service you can setup up yourself for free on your own server, and pair with Android, Microsoft, Mikrotik, Raspberry Pi or what ever device you like. It does not gives deep anonymity over the internet but it gives you a balanced and reliable connection when you want to have secure backdoor(s) on your network both at home or when your internet life are on the road.
The concept are easy: the devices are parried to each other with keys that are so simple to generate and copy your nearly don’t believe it. Been part of Linux kernel 5.6 and Windows 10 H22 version and later you are good to go.
Public keys mirrored:
Server <==> Peer
Private Key ==> Public Key
Public Key <== Private Key
As you can see no private key should be placed anywhere but the designated space under respective local interface settings.
Prerequisites before installing Wireguard
I use delightful Debian for my server and my network are names ens3. I go for VPN network 192.168.12.0. You may call it everything within the standards of IP protocol for home use like 192.168 , 172, 10….
Wireguard are very smart making a new virtual network with the same name as the config-file. I use wg0, and you can have nearly as many you like with different names.
I also added Bind9 DNS server on the server so speed everything up in your daily life. Takes one minute only.
On the server we need to open up the Wireguard listening port on UDP like port 51820.
You should absolutely install a firewall first like UFW and name server as cache like Bind9.
The complete ready to go solution are in four phases. I will guide you here:
First Phase, How to Install Wireguard On your (Linux) Server
This guide are made with some additional tools in other make copying public easier. If you have Bluetooth as well you may use fast copying this way from your smartphone.
On server (via SSH)
#apt update && upgrade -y
#apt install wireguard qrencode resolvconf –y
Let’s key 🗝️
Now lets generate new codes to pair your computers or smartphone:
#cd /etc/wireguard
#cd umask 077
#wg genkey | tee privatekey | wg pubkey > publickey
Tip. I use Windows 10 as the management platform, so open up notepad to copy all the keys and temporary settings are smart way.
Grab a copy with your mouse of the keys by
#cat privatekey
#cat publickey
and place them in notepad. This way you can keep you config file open while “trimming the borders”.
Next step is to make half of the configuration file:
#cd/etc/wireguard
#nano wg0.conf
Add  this codeconfig:
[Interface]
PrivateKey = Insert your generated private key here
Address = 192.168.12.1/24, fd86:ea04:1115::1/64  //change to your own preferred
ListenPort = 51820 //change to what your prefer


## this gives firewall access when Wireguard are active, and close it when down.
PostUp = iptables -I INPUT 1 -i ens3 -p udp --dport 51820 -j ACCEPT
PostUp = iptables -t nat -I POSTROUTING 1 -s 192.168.12.0/24 -o ens3 -j MASQUERADE
PostUp = iptables -I INPUT 1 -i wg0 -j ACCEPT
PostUp = iptables -I FORWARD 1 -i ens3 -o wg0 -j ACCEPT
PostUp = iptables -I FORWARD 1 -i wg0 -o ens3 -j ACCEPT

PostDown = iptables -t nat -D POSTROUTING -s 192.168.12.0/24 -o ens3 -j MASQUERADE
PostDown = iptables -D INPUT -i wg0 -j ACCEPT
PostDown = iptables -D FORWARD -i ens3 -o wg0 -j ACCEPT
PostDown = iptables -D FORWARD -i wg0 -o ens3 -j ACCEPT
PostDown = iptables -D NPUT -i ens3 -p udp --dport 51820 -j ACCEPT


#Raspberry Pi  //first half of the forthrcomming peer
[Peer]
PublicKey = (we add this later)
AllowedIPs = 192.168.12.100/32
Second Phase, Install WG on Peer(s)
Now on your peering computer you simply do the same:
On peer computer like Raspberry Pi (via SSH)
#apt update && upgrade -y
#apt install wireguard qrencode –y
#cd /etc/wireguard
#umask 077
#wg genkey | tee privatekey | wg pubkey > publickey
Tip. I use Windows 10 as the management platform, so open up notepad to copy all the keys and temporary settings are smart way. You can do the same on Raspbeery PI or Ubuntu if you like.
Grab a copy of the keys by
#cat pubkey
#cat publickey
and place them in notepad. Tip: Make headline so you can differ them from the server, or delete the server codes so you don’t mix them up.
Then:
#cd/etc/wireguard
#nano wg0.conf
Add this code config. It differ a bit from the server but the syntax are the same:
[Interface]
PrivateKey = Insert your generated private key here
Address = 192.168.12.100/24, //change to your own preferred

#Server
[Peer]
PublicKey = Here you add the public key from your server
Endpoint: 123.456.123.456:51820
AllowedIPs = 0.0.0.0/24
DNS = 192.168.12.1/24
Now save the file and start the Wireguard service:
#systemctl enable wg-quick@wg0 //this makes it start at boot
#systemctl start wg-quick@wg0
Test by:
#systemctl status wg-quick@wg0 //if its red and dead reconfigure
#wg
#ip addr
Third Phase, Back On Your Server
#nano /etc/wireguard/wg0.conf
find this part:
#Raspberry Pi  //first half
[Peer]
PublicKey = (we add this now)
##D2ndummy9u3+zDnDhGhYi1screoqV0HrY8jFV+BDk=
AllowedIPs = 192.168.12.100/32
DNS= 192.168.12.1
Now paste you public key from your peer computer.
Save the file.
Start the Wireguard as service:
#systemctl enable wg-quick@wg0
#systemctl start wg-quick@wg0
Test by
#ip addr
#wg
#ip a show wg0
in order to control all up and running.
Server Say yes to routing
You are now more less ready to use your Wireguard VPN but you need to allow your server to route and forward network traffic:
On the server:
#nano /etc/sysctl.conf
Add (or remove the # in front)
net.ipv4.ip_forward = 1
Save the file.
Reload with new settings.
# sysctl -p /etc/sysctl.conf
Now you can start the service:
#systemctl enable wg-quick@wg0
#systemctl start wg-quick@wg0
Now do:
#ip addr
#wg
Phase Four – Clean up
Now Delete the clipboard on the smartphone and the notes.
Post notes:
We can discuss very long whether its the right thing to do to add the IP-tables code in the Wireguard config file. As I use both UFW and ConfigServer Firewalls I found in praxis that this works smoothly. If Wireguard are down just restart it. And more over it closes all doors amd ports when its down.
How to do Wireguard on Android as Client
Its very easy and follows the same syntax. Just add a peer-section in your server config file with your preferred IP and copy public codes.
Nearly everything are automaticlly made for you. Lets go:
its a 3-step mirrored config:
First on your server
#cd /etc/wireguard
#nano wg0.conf
add this new peer in the end of the file; assuming your IP are 192.168.12.30:
##samsungsmartphone
[Peer]
PublicKey =
AllowedIPs = 192.168.12.30/32
Save the file.
Now lets grab the server public key. But this time we use a smart tool to generate it for us:
qrencode:
#qrencode -t ansiutf8 < publickey
Now you should have a fine QR-code on the console.
Tip: You might copy the public key as before and use https://www.qr-code-generator.com as your encoder instead.
Or you can copy and save it as a text-file on your computer, and transfer it by Bluetooth.
Using manual key-stroke are possible but you might likely failure if you have not got lots of coffee in order to be awake.
Second step: Peer Your Smartphone
Install Wireguard app in the app store (Google Play)
Open the Wireguard App
Jes Saxe (c)
Lets generate Private and Public Keys first press
“generate PRIV key"
Now you have have a blurred private key and corresponding public key you can see.
Now you need to add your server as peer:
At the button press
Add peer
Jes Saxe (c)
Then do:
QR-scanning from your servers console on your smartphone.
Copy the key, and insert it into your peer.
Add Endpoint and port like your server real IP:
IP: 123.456.789.098:51820
Allow IP: 0.0.0.0/0
Save the settings.
Now you nee to copy the public key from your smartphone and over to your server. This can be pain staking but using Bluetooth and filetransfer does the trick.
In Wireguard app:
Place the curser on the public key.
Press
"copy"
Now in notepad like Samsung notes, make a new note. Copy the clipboard content to the file. Save with the name as SmartphonePubKey.
Now press “share” save as file. Open your file manager, find the file (regualry in the Document folder), mark it and press “share”. Choose BLuetooth. On your PC, Start Bluetooth pair the devices ,and press “recieve file”.
On your smartphone:
Press send
On PC, says yeas to recieve.
Now you have you very long public key you can open, mark the text, copy.
Third step: On the Server again
#nano /etc/wireguard/wg0.conf
Find this part:
##samsung
[Peer]
PublicKey = PASte YOUR KEY NOW
AllowedIPs = 192.168.12.30/32
and paste the public key.
Save the file.
Restart the VPN by:
#systemctl restart wg-quick@wg0
Control its running by
#systemctl status wg-quick@wg0
#ip addr
#wg
Smartphone VPN time
Start the Wireguard service on the smartphone – Slide the on/off button.
Check it by going to
www.ip.me
If your address are the servers your goood to go. If not you need to check everything slowly again.
Note: On Samsung Smartphone used as hotspot the Wireguard are only enabled for the phone and the app itself. Now for the PC’s and gadgets connected. You need to install WG on each of them.
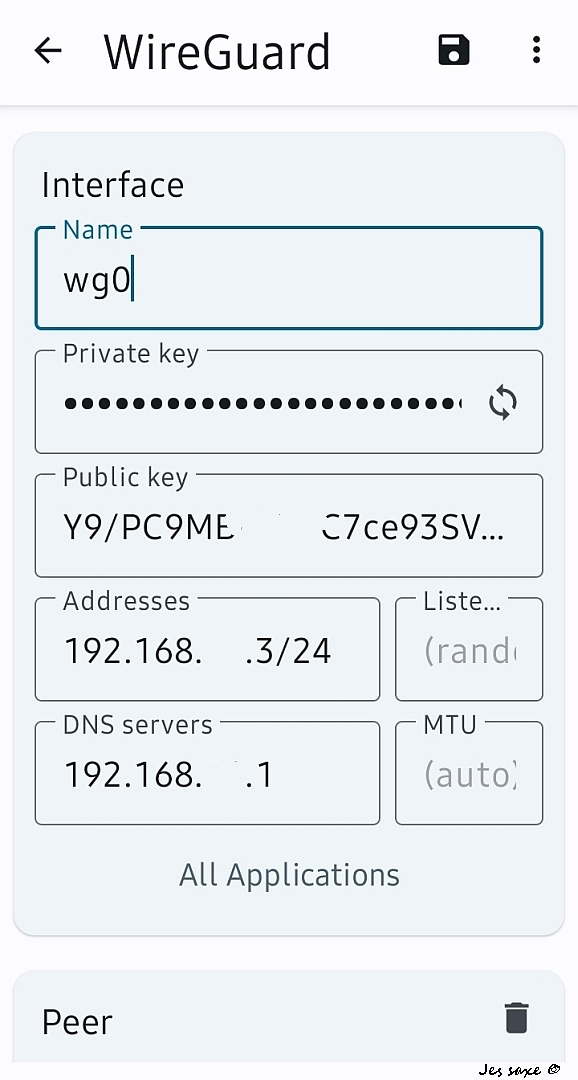
Install Wireguard on Windows Client
Download the app from Wireguard Download Homepage (Please no 3rd part version)
Install the app.
Open it up, then
Press Add Tunnel -> Add Empty Tunnel (or press CTRL+N)
Private and Public keys are now Automatic generated
Then add a name for your virtual network like wg0 or Wireguard
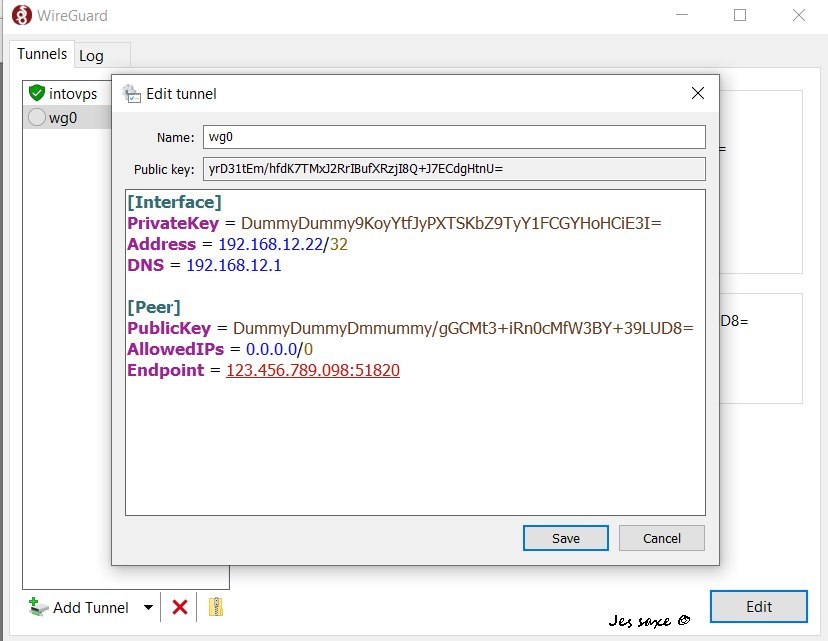
Then add the settings:
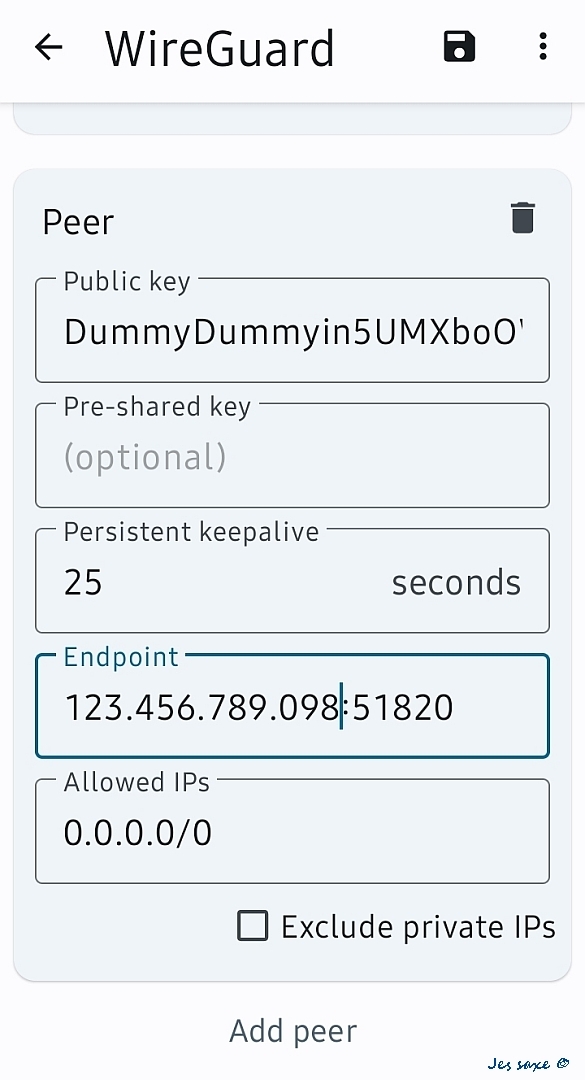
[Interface]
PrivateKey = <Added Automatically>
Address = your IP of your local VPN /32
DNS = 192.168.12.1   // If you have a server running.


[Peer]
PublicKey = Paste your PublicKey from your server here
AllowedIPs = 0.0.0.0/0
Endpoint =987.654.321.098::51820
Save it
Copy the Public key to your notepad.
3rd Step Back on the Server
On your server make a new peer:
Paste the puclic Key
and add the VPN-IP for your PC;
Save and restart.
Check all is good on the server using
#wg
#ip addr
Start the Wireguard app on the PC:
Now check all are green and works on www.ip.me
You might open a console like cmd.exe and do a network config test like
C:\ipconfig

Unknown adapter wg0:

Connection-specific DNS Suffix . :
IPv4 Address. . . . . . . . . . . : 192.168.12.10
Subnet Mask . . . . . . . . . . . : 255.255.255.255
Default Gateway . . . . . . . . . : 0.0.0.0
Wireguard on VirtualMin as Server
Running WG Server on VirtualMin are possible. At present there are no easy fix module but with a bit of twist you are there. I have tested on Debian Buster 5.10.0-28-cloud-amd64 and goes fine.
I use ConfigServer free firewall as it gives a lot protection combined with flexibility.
You might use the build-in firewalld or IP-tables in the admin page and add the rules manually… if you have lots of coffee and pizza on stock 🍕
Best practice tried out so far can be done less than 1 hour:
- Install VirtualMin as usual.
- Install CSF as decribed in the manual. Open up and add tcp ports like 10000 and 2000o for now. Also add a note about the WG settings are another place.
- Install Wireguard, make keys, make config file wg0.conf and add preliminary information.
Do not add the routing tables as I described before .We move them to CSF instead. - Add the WG info on the client.
- Add the peer public key.
- Make the file /etc/csf/csfpost.sh
- Add this settings:
#!/bin/sh
#Wireguard config add date curerent date by your name
iptables -I INPUT 1 -m state --state ESTABLISHED,RELATED -j ACCEPT
iptables -I INPUT 1 -i ens3 -p udp --dport 51820 -j ACCEPT
iptables -t nat -I POSTROUTING 1 -s 192.168.12.0/24 -o ens3 -j MASQUERADE
iptables -I INPUT 1 -i wg0 -j ACCEPT
iptables -I FORWARD 1 -i ens3 -o wg0 -j ACCEPT
iptables -I FORWARD 1 -i wg0 -o ens3 -j ACCEPT
iptables -I FORWARD 1 -i wg0 -o wg0 -j ACCEPT
No spaces between the lines. It won’t route properly.
Last line are and additional router in order to reach client to client. If you have a more complicated setup you should do that on local router level.
Start Wireguard as usual by #systemctl start wg-quick@wg0 and enable it at boot by #systemctl enable wg-quick@wg0
No flush the current ip-tables settings from a console Not putty ssh as you might get locked out
#iptables -F
#iptables -X
Reload with new routing and settings by:
#csf -r
#systemctl restart csf
#systemctl restart lfd
Now you should be capale of using Putty SSH again.
Test the tables by
#iptables -L
Start the WG Client and check all works and do the routing as desired.
You might need to add udp port 51820 for permanent outgoing in /etc/csf/csf.conf.
Now you should be able to harden your firewall and system now removing unnwanted ports like mail, ssh, admin pages so you only access them by VPN.
Still having Firewall problems
I use a VPS supplier, who have the option for external firewall which I use very intentively and made rules so only the most basic needed ports are open. In this you make and special WIREGUARD-FW Group and add this to your server.
Ingress: UPD 51820  everywhere
Engress: UPD 51820  everywhere
You might see in the log file ore realise some of your apps on the smartphone don’t work at all, like Orkla Speedtest even its taken place in a browser. Add these rule:
Engress: TCP 8080 everywhere.
This way you might get rid of voring firewall problem in your WG VPS.
Wireguard on Mikrotik hAP
WG on Mikrotik can be setup as either a server or client. The main task are more less equal apart from a few settings.
Yo may install everything using command line mode like explained here at Mikrotik or you may follow my graphical mode using WinBox:
1 – Server Mode aka Road Warrior Mode
This mode install the Mikrotik as server like Linux box.
Install interface
Left Menu Interfaces -> Interfaces -> Add Interface. Add A name. Save.>
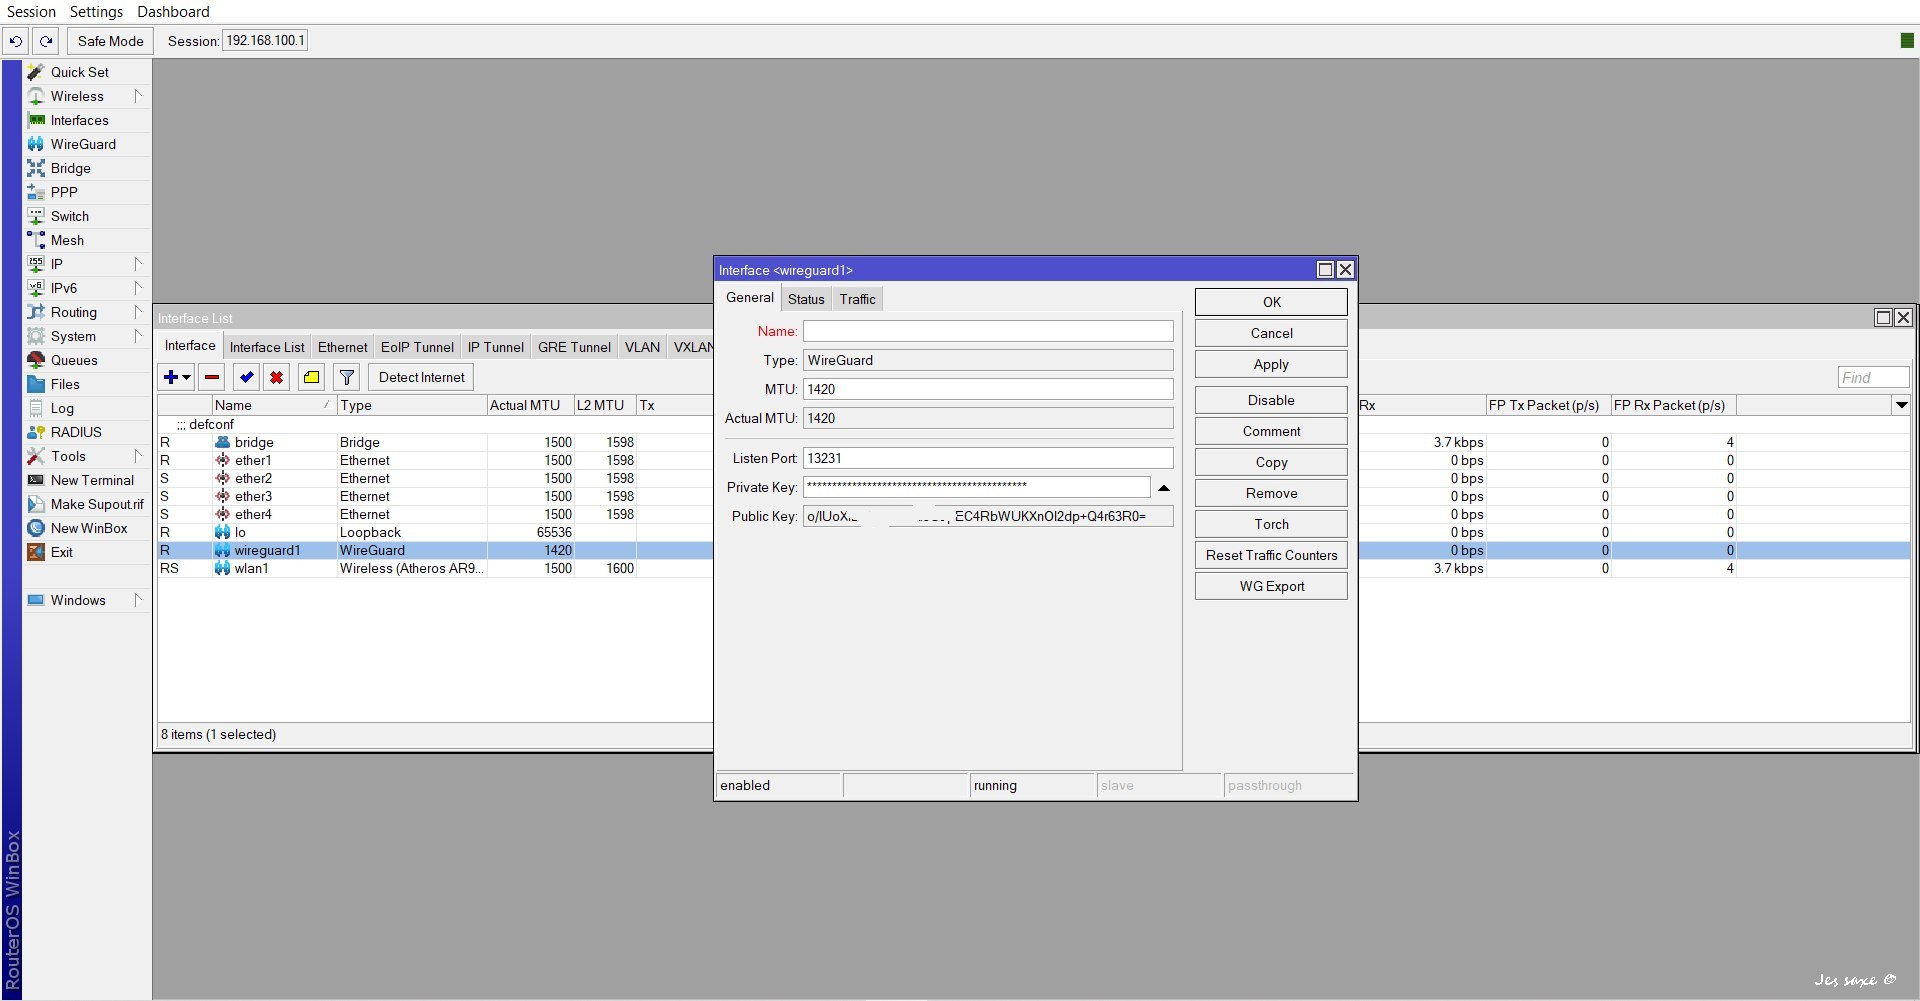
The private key and public key are automatically constructed. Copy the Public key and paste it in notepad. You neeed in a moment
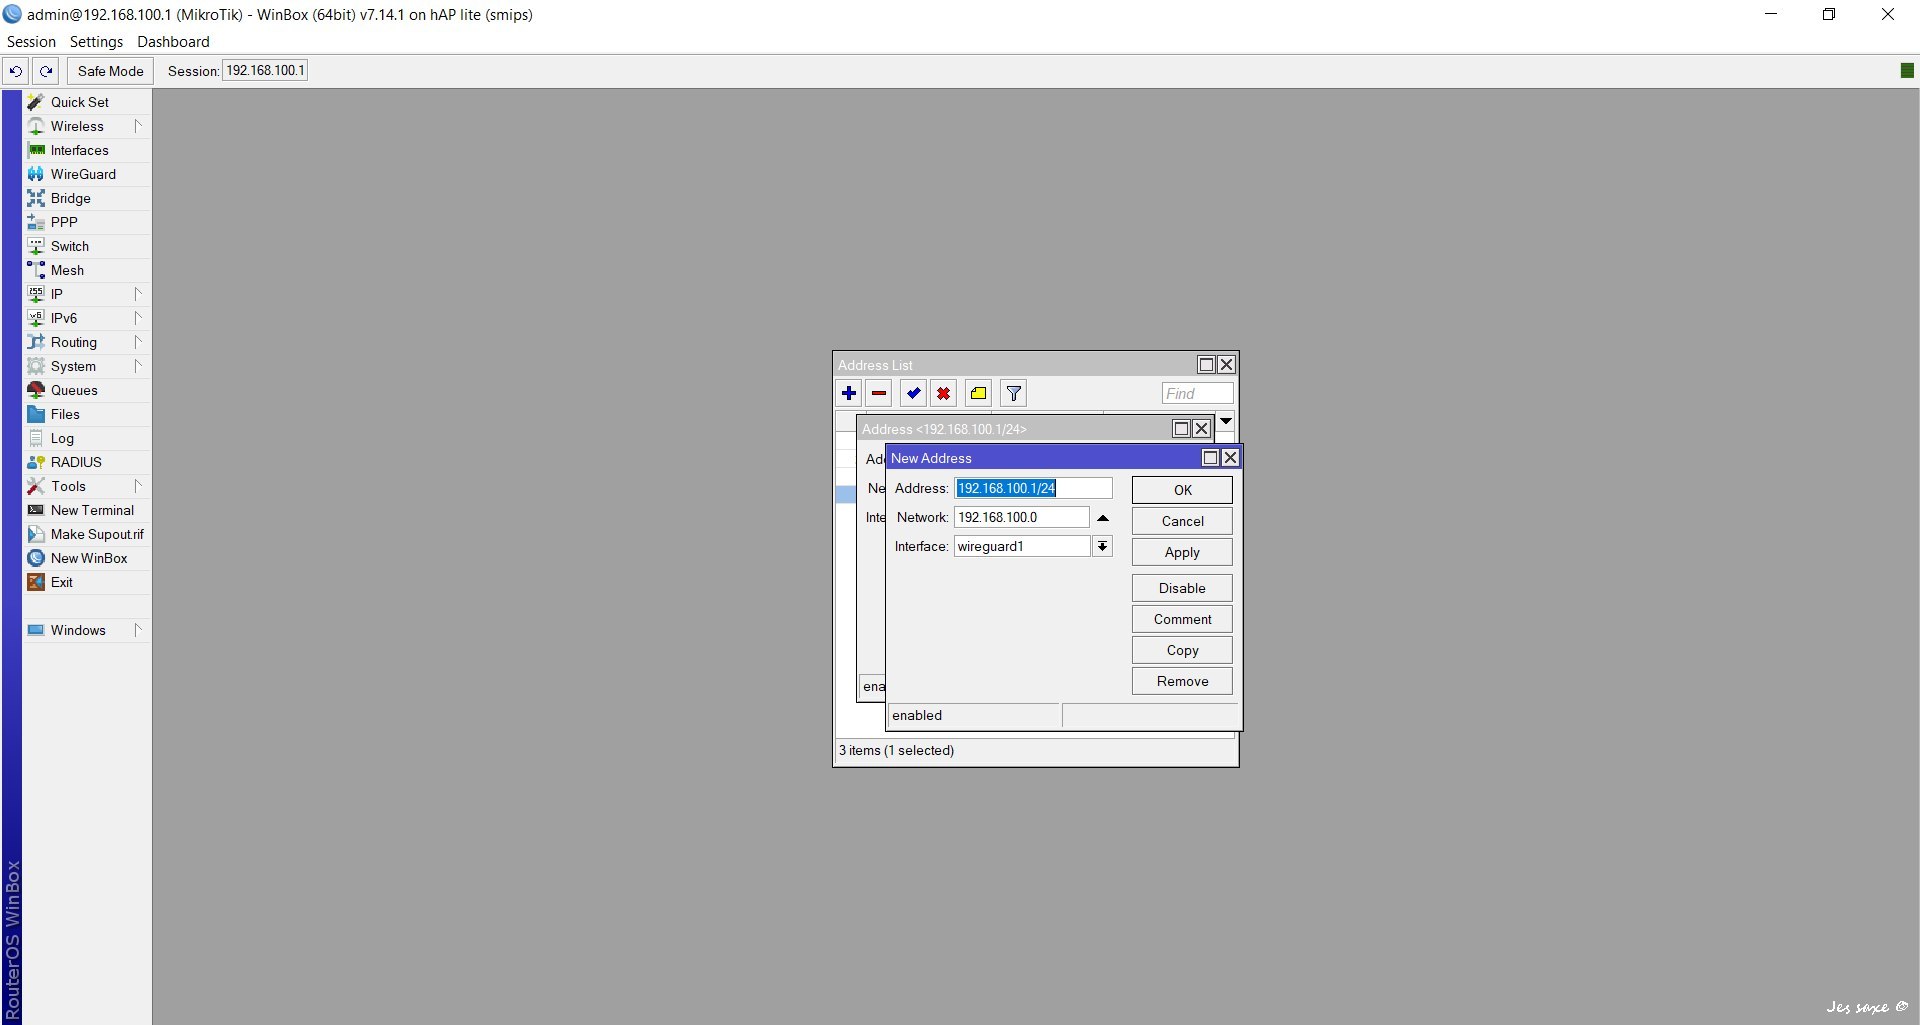
Add IP address to your box
Left Menu -> IP -> Addresses -> Add Address. Choose interface as Wireguard; Add the address you desire,; Add the net. Save
2 – On your WG client like Windows 10
Add a new empty tunnel (CTRL+N) -> Make Peer -Add the setting like this:
[Interface]
PrivateKey = <Paste PRIV KEY from Windows>
Address = 192.168.100.120/32
DNS = 192.168.100.1

[Peer]
PublicKey = <Paste Public Key from Miktorik here>
AllowedIPs = 0.0.0.0/0
Endpoint = 123.456.789.098:13231 <the Mikrotik Officiel IP>
Save. Don’t enble yet as you will get logged out of your Mikrotik Box
Copy your client Publik Key. Paste it in notepad if you like
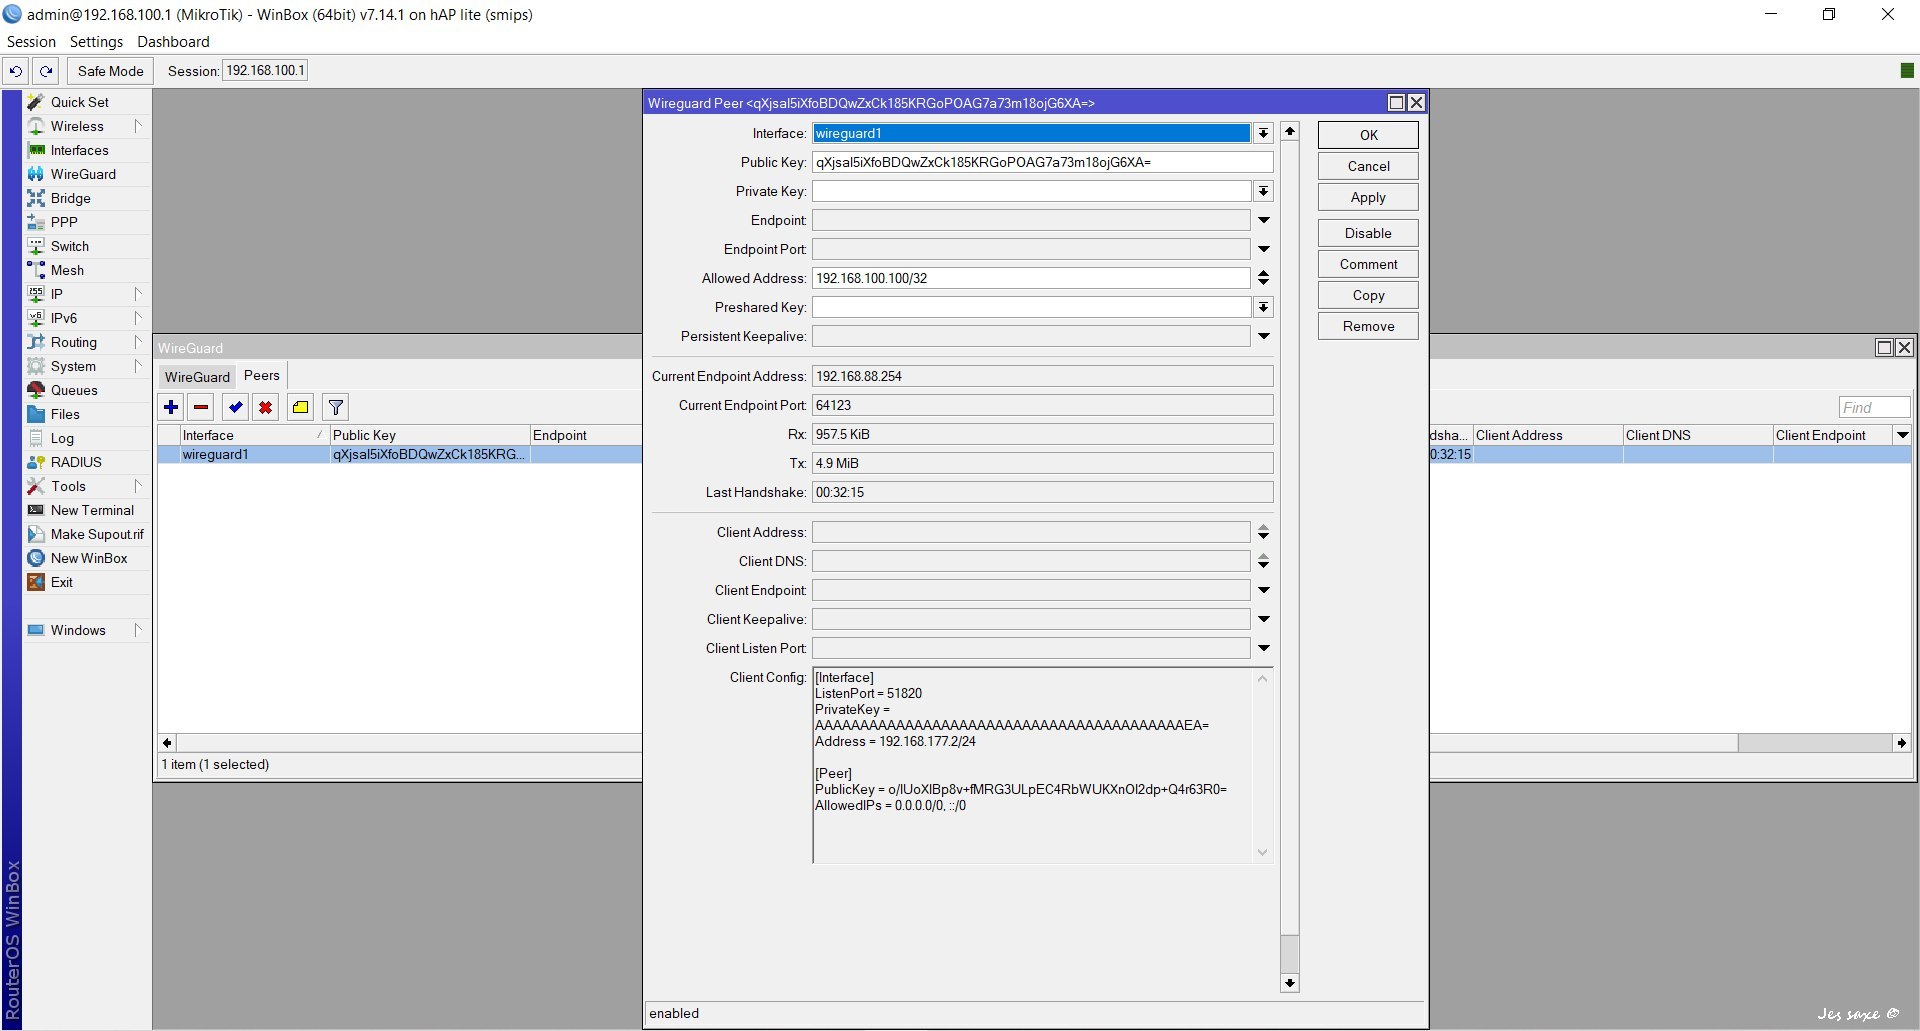
3 – Back on the Mikrotik Router
Add Peer
Left Menu -> Wireguard -> Add Peer
Jes saxe ©
Here you fill out:
Interface -> Choose Wireguard
Public Key -> Paste the key from your Client
Allowed Adress -> The IP of your clemt
Save.
You should find interface and peer are enabled. If not, control your settings from the beginning.
Firewall Settings
Hopefully you have the firewall running etiher with default Home Router Settings or more strict so you need to open up the port for WG and to allow the traffic.
Firewall rule for listening on public Wireguard port
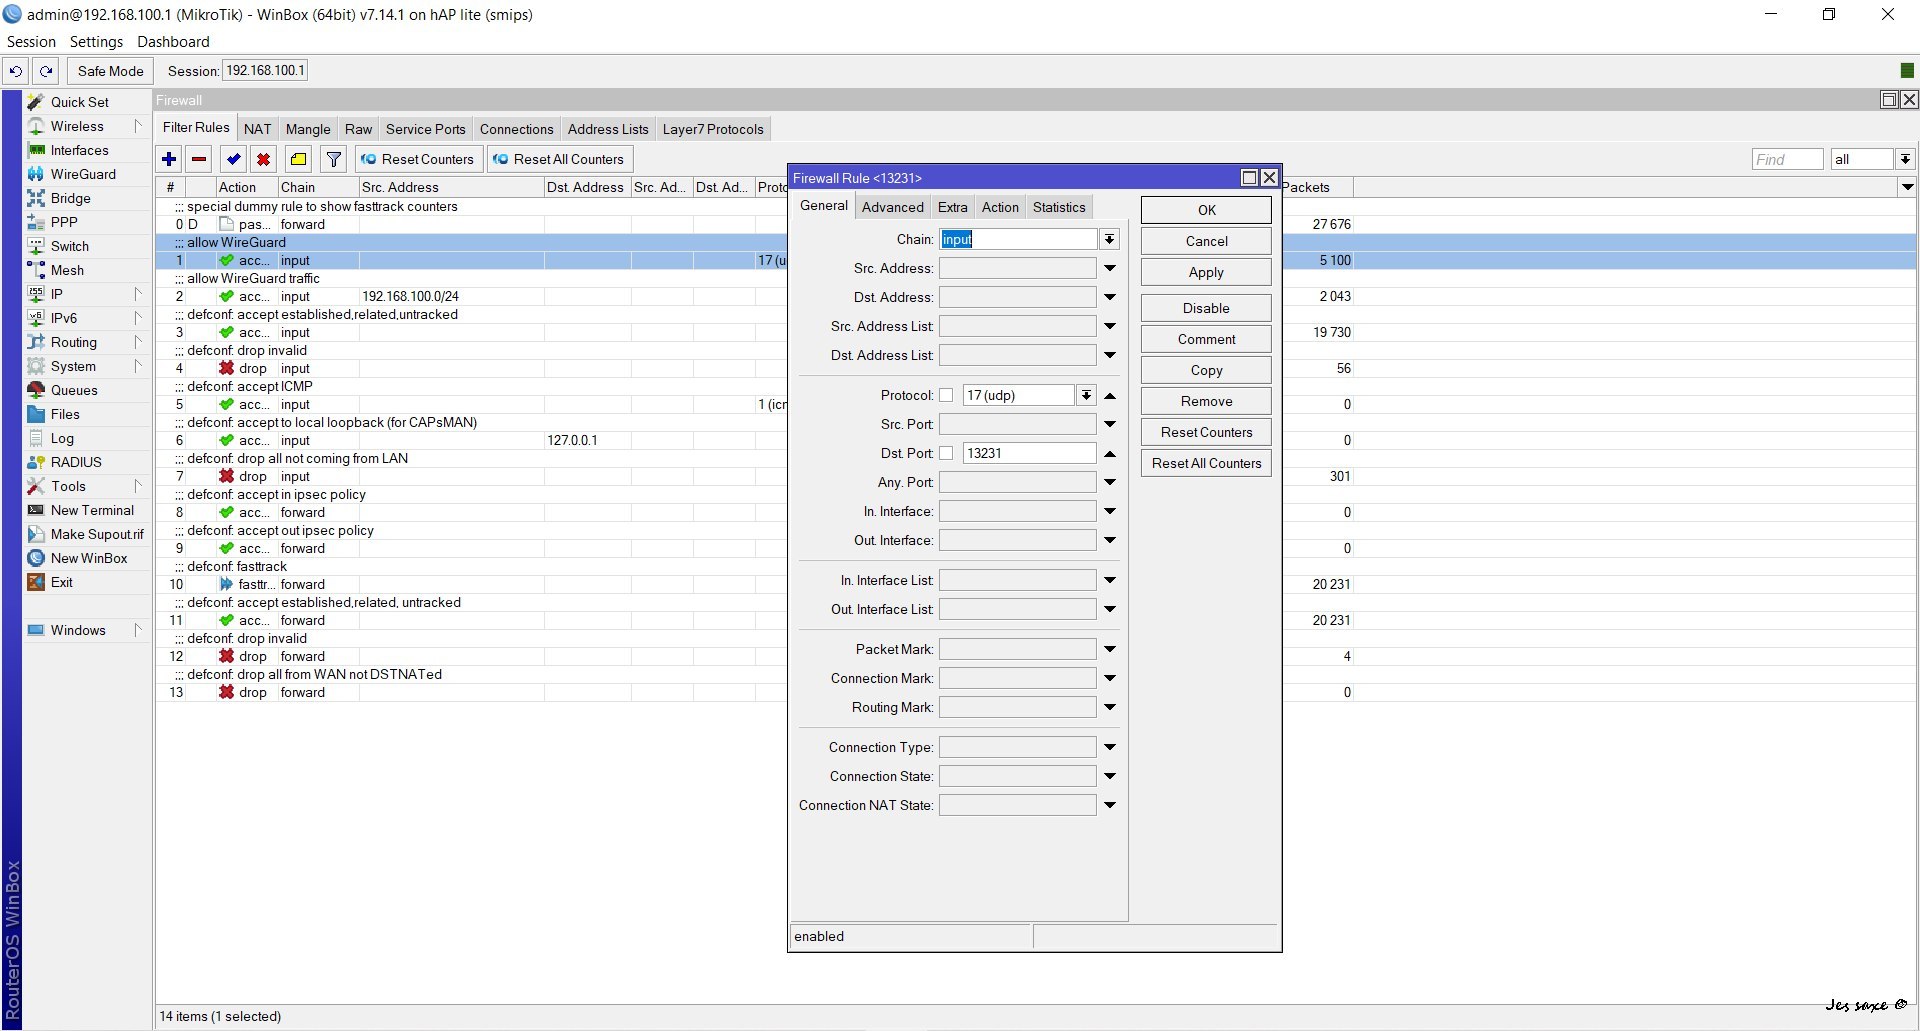
Jes Saxe (c)
Do:
Left Menu IP -> Firewall -> Add FW Rule
Fill Out:
Chain -> Input
protocol -> (17) udp
dst port -> 13231
comment -> Allow Wireguard
Save
Move the rule to position #1 by mouse
Allow internal Wireguard traffic
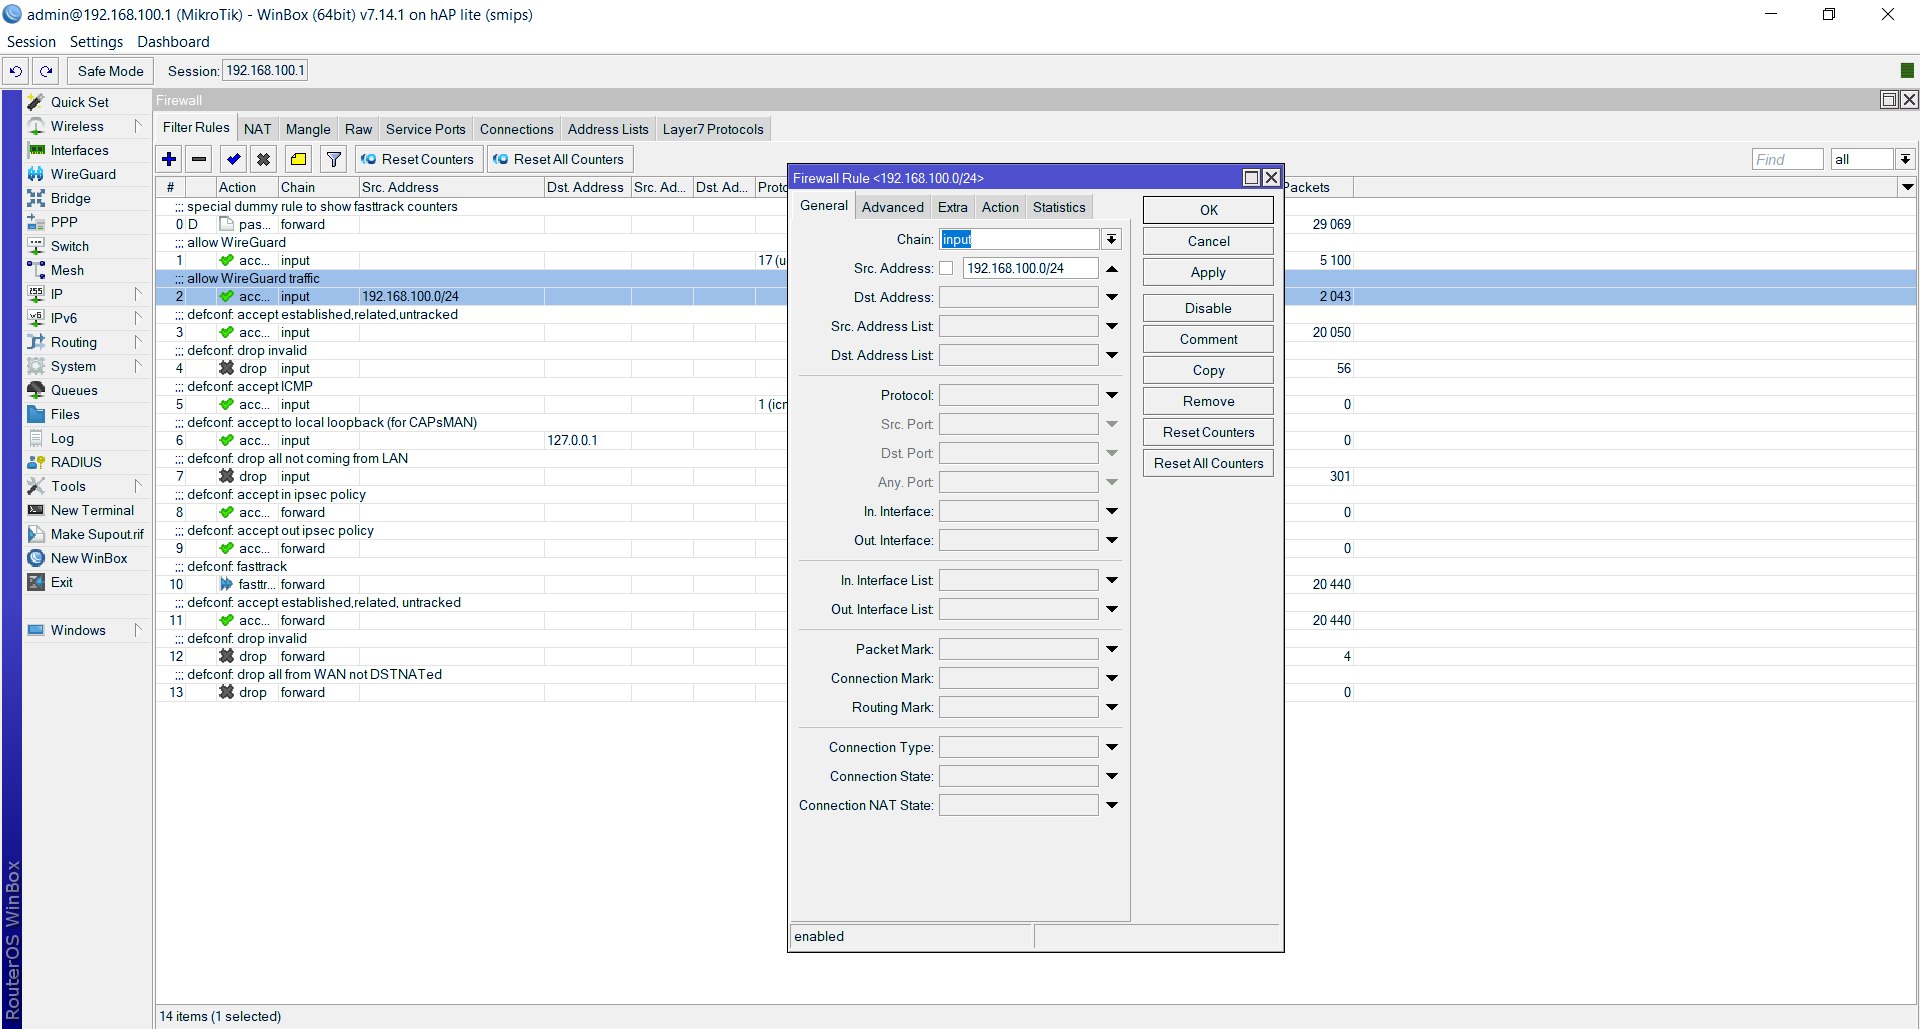
Jes saxe ©
We all need a rule for making the internal traffic on Wireguard allowed.
Do:
Left Menu Ip -> Firewall -> Add Firewall.
Fill Out:
chain -> input
src-address ->192.168.100.0/24
comment -> allow Wireguard traffic
Save
Move the rule to position #1 by mouse
The smart thing of Mikrotik is it’s astonishing fast. You don’t have to reboot, just press the enable and you are on.
Now you can start the WG client on Windows on control everything works as demanded.
Sometimes your trouble to access can be caused be the dynamic not always very smart IP for end users of the Telcos.
First make sure they don’t have a firewall or NAT that don’t reroute to your router. This particular a problem on mobile routers and can be hard to fix.
By dynamic IP change every day you might get helped by the Mikrotik Cloud function. Enabled it and use that as phantom static URL
Don’t forget to reuse the electrons:
Final Task: Clean Up
Delete all temp files and clipboards plus the bins!!
It looks complicated but ist not. 15 min and you are done.
Known Errors and bugs
On Raspberry Pi latest version Bookworm (Linux 6.6.20+rpt-rpi-v7 #1 SMP Raspbian 1:6.6.20-1+rpt1 (2024-03-07) armv7l GNU/Linux) you might have problem when added DNS or the interface like
DNS = Your IP for DNS
Trying to start fails and you might see this error code in the “systemctl status wg-quick@wg0”
wg-quick@wg0.service: Main process exited, code=exited, status=127/n/a
Mar 27 22:11:34 raspi66 wg-quick[12340]: [#] resolvconf -a wg0 -m 0 -x
Mar 27 22:11:34 raspi66 systemd[1]: wg-quick@wg0.service: Failed with result ‘exit-code’.
Mar 27 22:11:34 raspi66 wg-quick[12342]: /usr/bin/wg-quick: line 32: resolvconf: command not found
Solution:
Install DNS resolver by “#apt install resolvconf” and you should be good to go.
IP – problem
Seems like Wireguard don’t like any local adress like 192.168.XXX.254/24.
Change to low value make it work.
References:
https://www.wireguard.com/
https://www.jordanwhited.com/posts/wireguard-endpoint-discovery-nat-traversal
https://wiki.debian.org/WireGuard
https://www.cyberciti.biz/faq/how-to-set-up-wireguard-firewall-rules-in-linux
https://help.mikrotik.com/docs/display/ROS/WireGuard#WireGuard-RoadWarriorWireGuardtunnel
Happy Wiring 🙂
Latest update MAY 2026
